
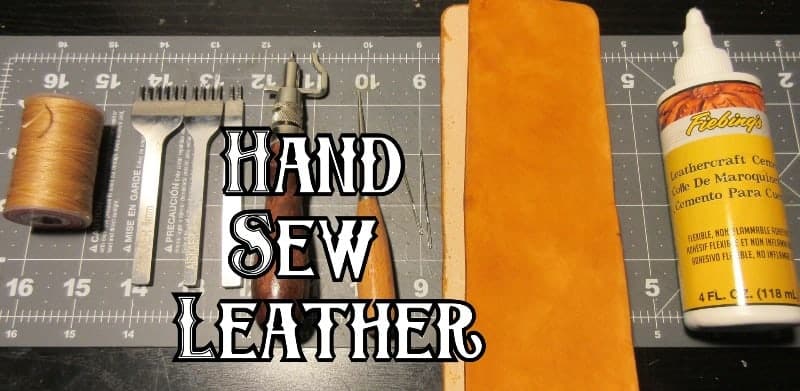
6 Steps to Hand Sew Leather
Sewing leather by hand can become very frustrating at times and can make or break your leather craft work. This quick guide will teach you how to hand sew leather or more commonly known as the saddle stitching.
There are a few different techniques to hand sew leather but this is one of the most common. It is also one of the fastest methods of hand sewing leather and easiest to learn.
How to hand sew leather
You will need two needles, chisel hole punch, glue, leather, thread and an awl. All of these items I use are mentioned in the article with links to check out prices.
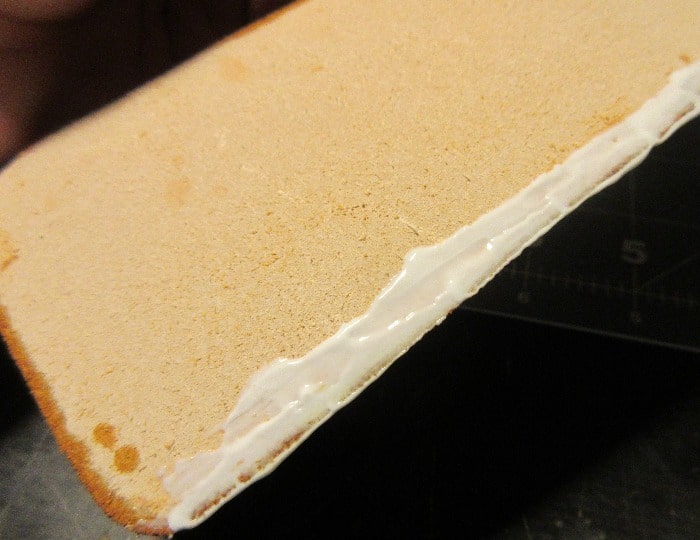
Step 1. Glue the leather pieces together
Before you start stitching, you are going to want to glue the pieces together to make sure they don’t split when you mark your stitching.
This can either be done with leathercraft glue; I am using Fiebing’s Leathercraft cement. Or if you have some contact cement around your house this will also work. The cement works just as well if not even better than some of the leather glue but takes longer to dry. It will also tend to dry in a yellowish color which can look unappealing.

Fiebing's Leathercraft Cement | Amazon
Buy at Amazon.com
$8.21
Super high strength, permanent bonding with long lasting results. Water-based contact adhesive can be used for a variety of crafts and on leather items such as shoes, purses, wallets, jackets, baseball gloves, furniture and more.
We earn a commission if you make a purchase, at no additional cost to you.
07/21/2026 02:02 am GMT

DAP 00107 Weldwood Original Contact Cement | Amazon
Buy at Amazon.com
$9.38
Weldwood Original Contact Cement is a multi-purpose neoprene rubber adhesive that forms an instant, high-strength bonds on a variety of surfaces. This adhesive offers hundreds of uses for the home, office, and workshop. The gel forms a strong bond on contact to eliminate the need for clamps, temporary fasteners, and long set times.
We earn a commission if you make a purchase, at no additional cost to you.
07/21/2026 12:01 pm GMT
If using the contact cement, you will want to apply to both edges and allow to sit for 5-10 minutes. Once the cement feels tacky you will then place the pieces together.
Scratch the surface of the leather with an awl or a razor blade if you are placing the glue on the top surface. This will secure the glue as it will stick to the grooves.
You will want to spread the glue pretty thin along the edge of where you want the stitching to be.
Once you apply the other piece of leather to the glued area you are going to want to use binder clips. These can be picked up at any office supply, Walmart or Target or here on Amazon for fairly cheap.

STPL Staples Binder Clips | Amazon
Buy at Amazon.com
$8.89
They feature spring-action to firmly attach to loose sheets or folders to hold them securely together. These clips make for ideal home office essentials. They come in a convenient 60-pack reusable plastic tub for easy storage. Place these 50 black small and 10 medium clips on a desk, a shelf or in a draw for quick access.
We earn a commission if you make a purchase, at no additional cost to you.
07/21/2026 04:00 am GMT
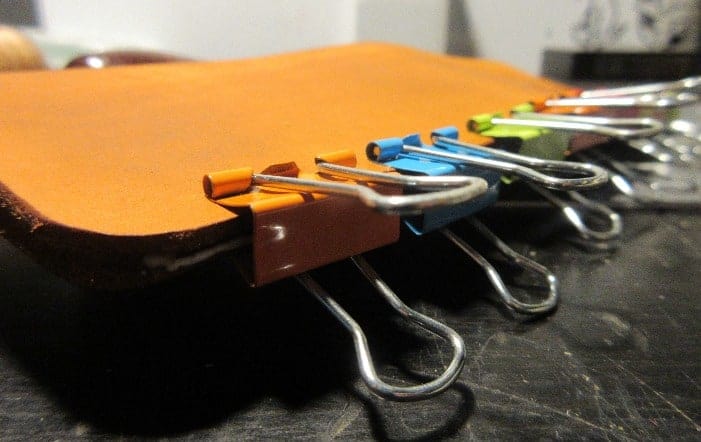
One tip for using these paper clips is to use two pieces of leather in between the leather you are clipping down. This will ensure that the leather doesn’t take on the shape of the binder clip tip. Over time it will fade away, so if you choose not to do this; it should disappear after the leather gets used.
Step 2. Mark your stitching
Using a stitching groover will help you determine a constant line along your project. These can be used to simply mark out a line or use to cut away a small section of your leather to inlay the stitching.

7 in 1 Adjustable Pro Stitching Groover | Amazon
Buy at Amazon.com
$8.95
Multi-functions all in one (drawing sideline, pulling ditch, digging trench). Portable, light and comfortable hand feeling and can adjust the distance from the edge of the leather.
We earn a commission if you make a purchase, at no additional cost to you.
07/20/2026 11:00 pm GMT
This is all personal preference and today I am using just the marking tool. This will give me a good basis of where my lines will go and if I need to put them higher or lower on the leather.
Wing dividers are a great alternative to create a very sharp line to follow.

ZLKSKER 6 Inch Adjustable Lockable Steel Divider Wing Leather Compass | Amazon
Buy at Amazon.com
$8.99
Precision and durable leather working compass/divider, also used in wood work, metal work and other drawing work. Perfect for drawing arcs, circles, divide gauges, dividing line, line segments, size measurement, etc.
We earn a commission if you make a purchase, at no additional cost to you.
07/20/2026 07:02 pm GMT
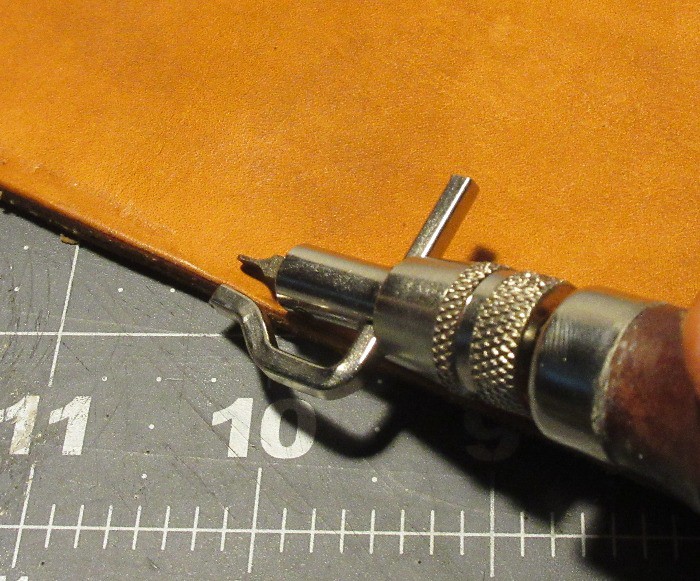
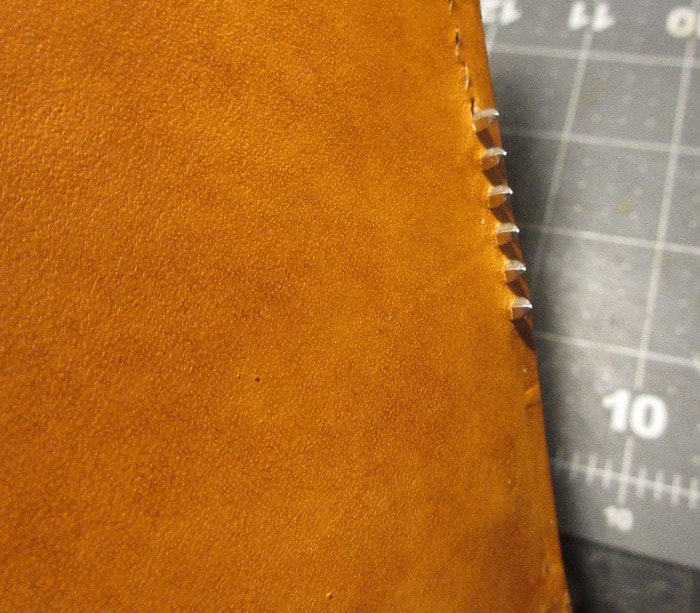
Step 3. Punch Holes
This can be down one of two ways and this can be based how you want the holes to look or the tools available.
The first way which is what I am doing as shown is using a leather stitching chisel.
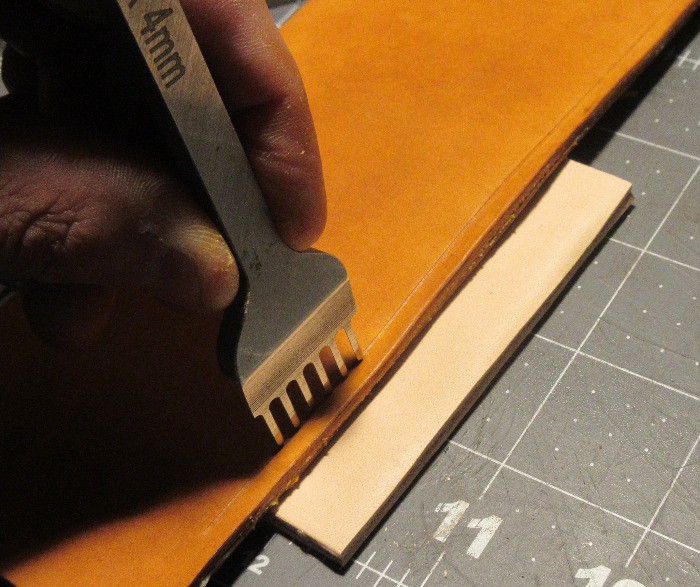
These to me work the best because they keep every hole aligned with the next one. There is no real room for error with these and they come in different shapes and sizes. I have the Aiskaer White Steel 4mm chisel set which for around $12. I have had no problem with these so far but they definitely are not the best ones around.

Chisel Stitcher Hole Punch | Amazon
Buy at Amazon.com
$8.99
Made of white steel, is a durable and useful leather craft tool.100% white steel material, non-inferior stainless steel. Each product's surfaces are coated with a rust preventive oil before shipping.
We earn a commission if you make a purchase, at no additional cost to you.
07/21/2026 04:01 pm GMT
They are slightly angled so the thread will have a nice diamond shape to them when finished. There are also circular hole punch chisel sets that work just as good, but the stitching will have a different look to it. This would help a lot if you want to use some really thick thread.
You will start at the beginning and hammer (mallet) your chisel through the leather and continue from the last hole you punched.
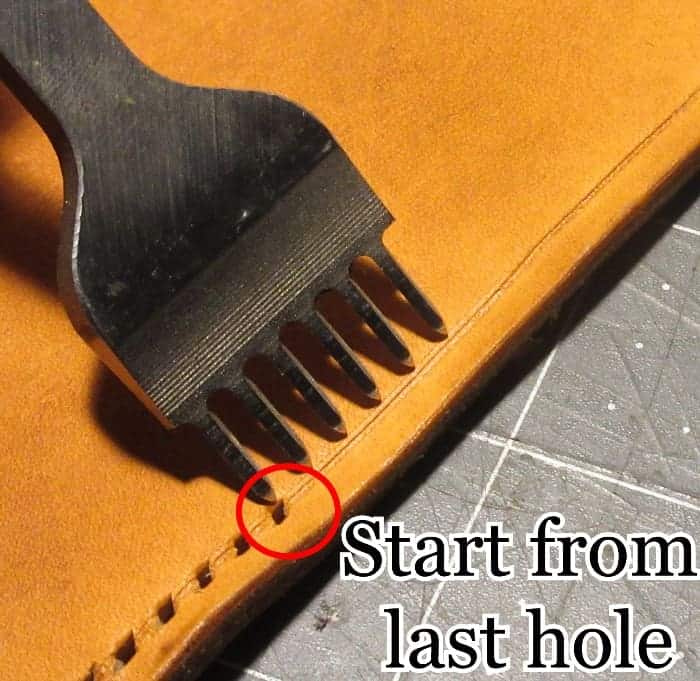
This will ensure no mistakes in spacing. It is also good to have a poundo board or thick cutting board below the leather. These will help prolong the life of your chisels and hole punchers plus the poundo board will reduce noise. If you do not have these available use 3-5 pieces of leather below where you are punching.

Weaver Leather Silent Poundo Board | Amazon
Buy at Amazon.com
$22.50
The Silent Poundo Board's rubber surface helps protect knife edges and hole punches from dulling and chipping. Helps absorb pounding concussion and sound.
We earn a commission if you make a purchase, at no additional cost to you.
07/21/2026 04:01 pm GMT
Having extra padding will avoid breaking the tip of the chisels.
There are also hand punch chisels that do the same thing but you can avoid using a mallet as it is shaped like a regular hole puncher. It is also very ideal for punching holes with little to no noise.
The second way is to use a spacing tool and punch the holes using an awl. This way is a bit more time consuming and you miss out on the diamond stitching look. The only upside about this method is that it is a lot more quiet than hole punching with a mallet. But if you are worried about noise you can always go with the hole punch chisels.

Leather Craft Tools, Craftool Spacer Set | Amazon
Buy at Amazon.com
$14.99
Spacing is a very important part of making your sewing look nice and neat. It takes all the guesswork out of punching the holes for sewing, nice and even spacing. Comes with four removable spacing-overstitch wheels in the most popular sizes spacing between 3mm,3.5mm,4mm,5mm. A must-have tool if you are doing any type of leatherwork!
We earn a commission if you make a purchase, at no additional cost to you.
07/21/2026 02:03 am GMT
It is also hard to create a uniform hole as average awls will widen the hole the further you push into the leather. Aiskaer leather stitching awl would be a better alternative since it has an even width if you are going to hand punch holes.

Aiskaer 1 Pcs Leather Craft Ebony Rhombus Awl DIY Leather Stitching Sewing Awl | Amazon
Buy at Amazon.com
The stitching awl is a practical tool to punch holes in leather and make it easy to stitch. The awl material is the imported steel. the overall quality is sharp.
We earn a commission if you make a purchase, at no additional cost to you.
Whichever way you choose is up to you as both ways will have a different outcome. Also be aware that the back of the leather when punched will have a smaller hole.
If you want to expand it, avoid going further through one side with an awl or chisel. Instead use your tool and push it through the backside to make it bigger and push the leather into the hole.
This I tend to avoid as it usually comes out looking fine anyways with the chisels.
Step 4. Threading the Needles
For some reason this was always a hard part for me when I was learning so I will break it down as best as I can.
There are many threads to use and to learn more about them you can check out different types of thread to use with leather. But you will mainly want to stick with polyester or bonded nylon thread.

Industrial Revolution 170 Meters Waxed Thread Polyester Leather Sewing Cord | Amazon
Buy at Amazon
Check other colors here
Made of high-grade polyester material, which gives you a comfortable touch feeling when you stitch the leather, and it is durable and you can use it for a long time.
We earn a commission if you make a purchase, at no additional cost to you.
Just as leather thread is different than average cloth thread, same with needles. They tend to have a bigger eye for the thicker thread to enter. You can check out the needles I am using in this article.

Large-Eye Stitching Needles for Leather Projects | Amazon
Buy at Amazon.com
$5.99
20 Pieces stitching craft needles in the clear bottle which keeps the needle secure and organize well. Needles are made of stainless steel, they are sturdy enough for leather working, and some thick clothes or shoes repair, vinyl upholstery mend.
We earn a commission if you make a purchase, at no additional cost to you.
07/21/2026 01:00 am GMT
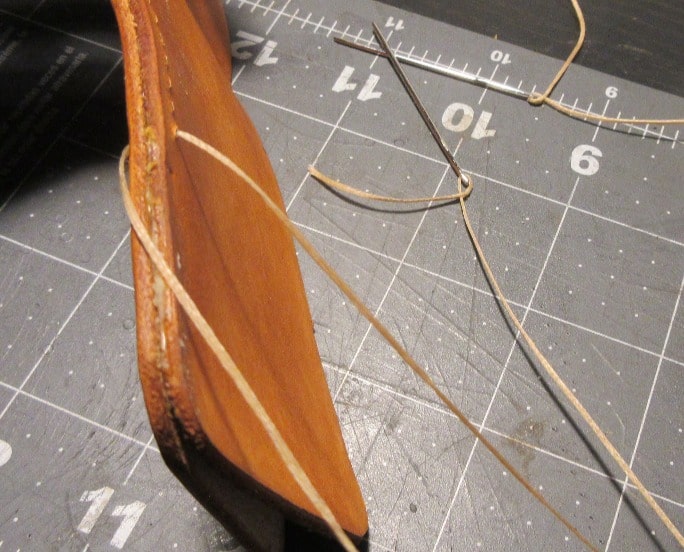
You’ll want to start with one needle and push the thread through the eye of the needle, make sure you have a couple inches through.
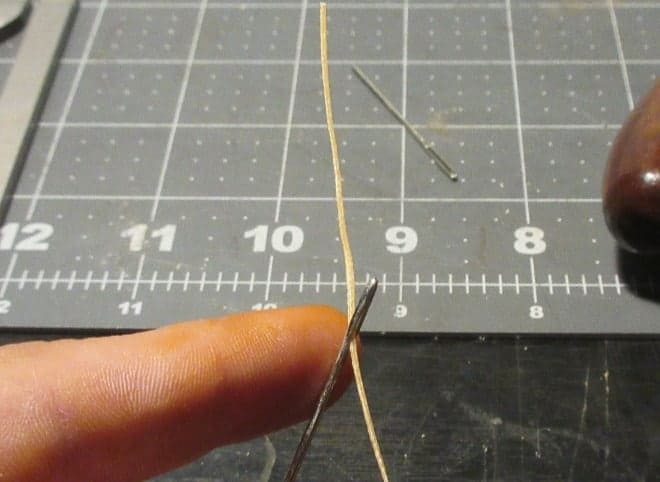
Then you will take the thread that is through the needle and pierce it through the tip of the needle.
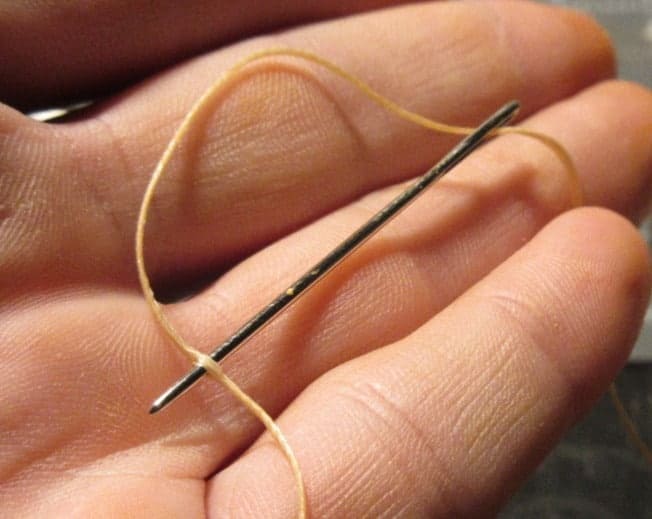
Once through and pierced onto the needle you should have a D shape in thread. You are going to take the part of the thread that is pierced into the needle and pull up until you get it wrapped around the thread.
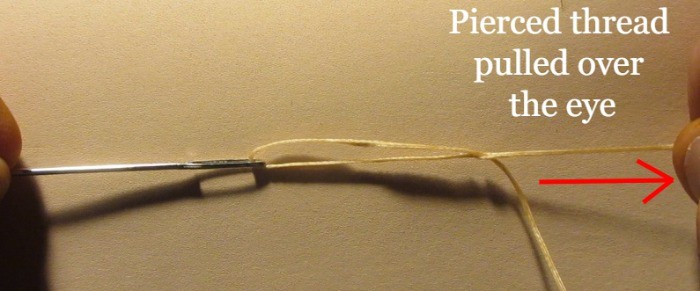
Lastly pull on the extra thread that is through the pierced thread till the “knot” reaches the top of the needle. This will give it strength when pulling through the leather holes.

Repeat for both sides. Now you should have a long piece of thread that has two needles on each end secured the same way.
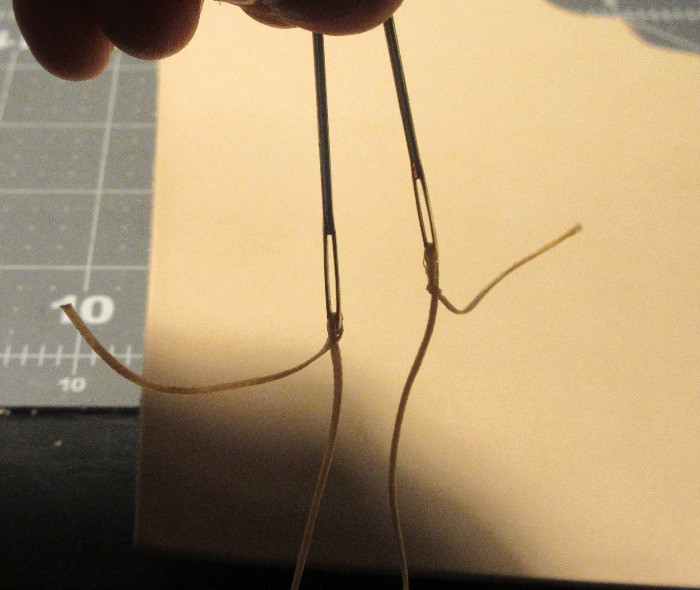
You can twist the excess thread to the middle thread to make the knot tighter.
Now you can begin sewing.
Step 5. Sewing the leather
To start you’ll want to run one needle through the first hole of the leather and pull on both of them until they are equal in length.
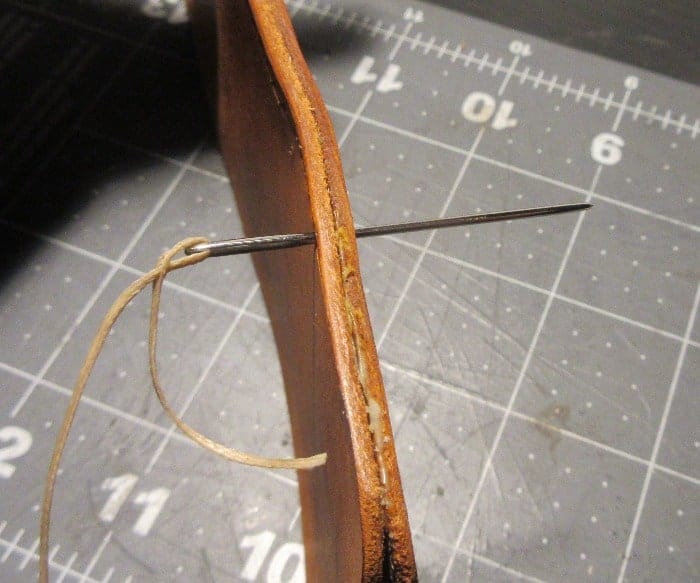
You are going to take one needle and go through the second hole and pull that needle through.
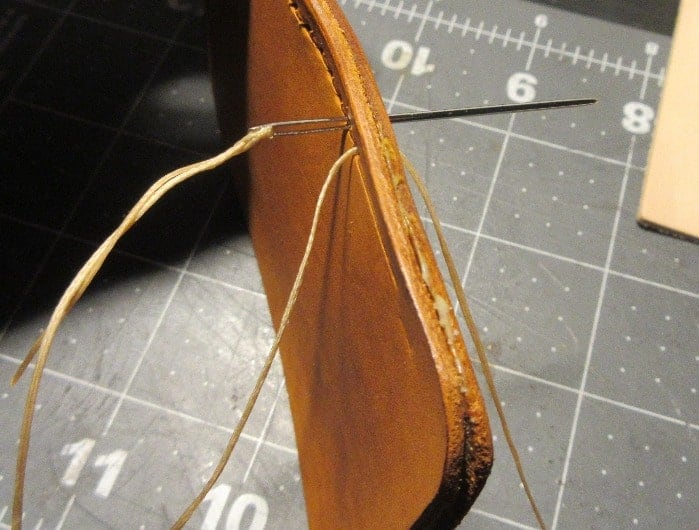
There should now be both needles on the same side, one through first hole and the other one through the second hole.
Next take the first hole needle and cross it over the second hole. Pull tight on both needles to secure the crossed stitch.
Now you will have one needle on each side and your first two holes covered.
You will just want to continue to go back and forth until you reach the end of the holes. Pulling tight, every time you pass each hole with both needles to ensure a tight hold and no bulging thread.
Avoid running a needle through a piece of thread. This can cause it to look a little off and cause the thread to frail out a bit.
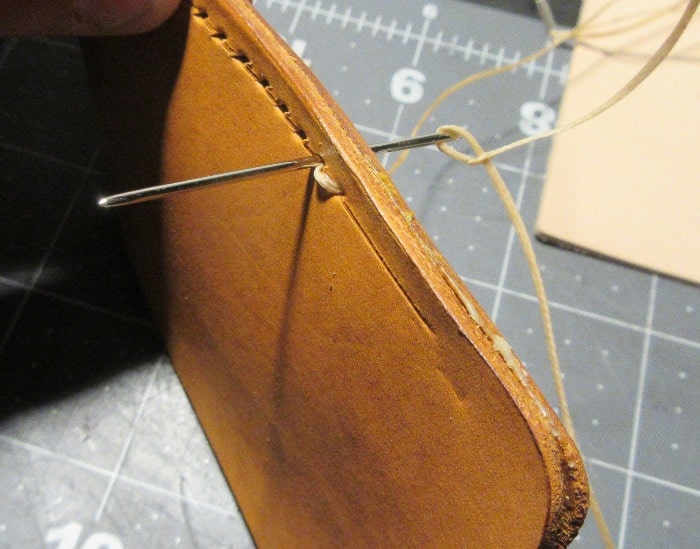
A tip to help out when stitching is to try to do the same technique on every hole or else your stitching will be a little wonky.
So what I try to do is once my needles are in the leather I’ll take my left side and go through the second hole. Then with the first right side needle I will go through the second hole but make sure my needle is above the thread.
I will always try to get the needle to go through the farthest part of the hole when going right to left.
Then once I get that one through I will take it through the next hole immediately. This leaves me with always having the threads on my right hand side and one always in front of the next.
Other people will put both needles through their next hole and pull evenly through. This is all preference and they can all come out with a small difference from each other. The best is to just try different things to see what is most comfortable for you.
The way that I do it feels the most fast and nice looking way for me. But I also do not have a stitching pony, as these are very nice since they hold your item for you.

Leather Craft Stitching Sewing Pony Horse Table | Amazon
Buy at Amazon.com
This leather stitching pony securely holds the leather, the vise section can be positioned so you can sit on the long base section to hold the pony steady while in use. Make your job much easier and faster.
We earn a commission if you make a purchase, at no additional cost to you.
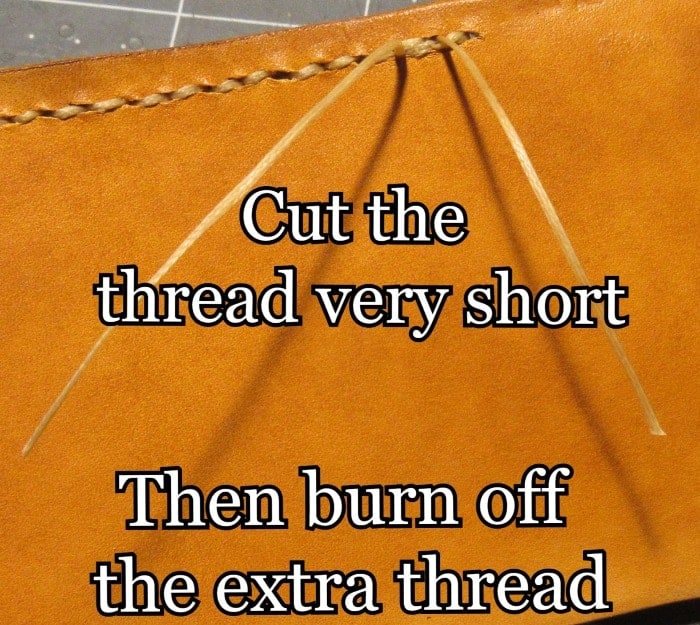
Step 6. Ending the stitch
Ending the stitch can be done by going back a couple holes and just cut the leather off. I don’t like to do this as it doesn’t feel like it is secure enough but there are two ways I will usually end mine.
The first is to get to the end, go back 2-3 holes, then going back to the end of the holes.
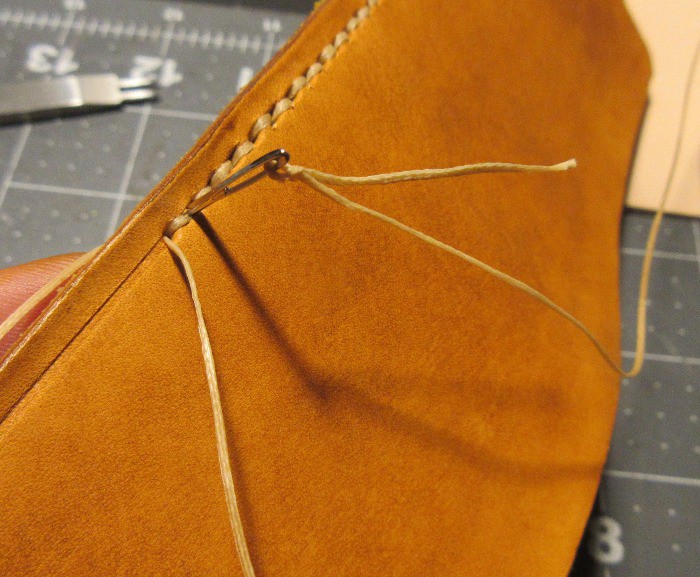
This then will have about six layers of thread in each hole making it very tight to the holes. Then I cut the thread very short, burn off the last bit of thread and smooth it down with my finger or lighter.
This can be done on both sides of the leather or you can have both pieces on one side to have one less melted leather piece.
The other way is to go back and forth then insert the need through and up one piece of leather. Then do this for the other side as well.
Now you’ll have both pieces of thread through the middle of the two pieces. Tie them together one or 2 times and cut off some of the excess thread.
Now you’ll two little pieces that will be sticking out where you can either burn them and tuck them into the leather or just push them in through the leather. This will create a small bulge that can be hammered down to get it pretty smooth.
Finished
And that is how to hand sew leather, at least the saddle stitch way for now. This way is universal whether you use an awl, a hole punch, or a chisel. If you want to add an unique look to your stitching check out 7 different ways to sew leather.