
Make a leather EDC Pouch
Adding a pouch to your belt can greatly come in handy to carry any small objects every day. So I decided to try to make a leather EDC pouch to easily attach to your belt. This walkthrough of how I made a leather pouch comes with a free template you can download and print to follow along.
I figure that not everyone will have a button or screw on conch as I used so you may have to opt in for making a strap. Making a strap is very easy and I will explain where to put it when we get to stitching the pouch.
Steps to make a leather EDC pouch
To start I am using a 4oz veg-tanned leather which is thick enough for me. But if you plan on holding heavier or sharp items you may want to make the pouch with thicker leather.
For this pouch I had used a mock up template, here to see if I need to change anything around before making it into a pdf. So I was using tracing paper to make my trace lines for each piece.
Step 1: Cut out all the pieces
This pouch is very simple, yet very handy. You will only need to cut out three pieces for the object. That is the back flap, front pocket and the belt loop piece.
If you do not have a button or conch to use for the back flap you will want to avoid cutting out the oval shaped piece on the flap. Also avoid cutting or hole punching the small hole for the placement of the conch.
If you are cutting a strap to follow along with the template, I’d recommend a 3.5” long by ¾” wide rectangle. This will be a good size to hold the flap in place and has a similar width to the conch I am using. You can also use any cloth/fabric button that is around 3/4”-7/8” in diameter.
If you are doing this, you may want to cut out the back flap hole a bit smaller to ensure the button will catch in the hole. Avoid cutting the hole out of the front pocket also. Instead place your button on top of the hole and use an awl to mark the stitching holes.
Cut out the template using a ruler, the holes for the belt loop and the hole for the conch/button. Once the paper has been cut out, use this to trace onto your leather.

You can use either side of the leather, but I tend to run an awl on the face of the leather. This will create a very thin line to easily trace with a blade. But if you want to avoid scraping into the leather, use the backside and a pen/colored pencil to outline the template.
Once traced onto the leather you can now start to cut out your pieces. Use a metal ruler for straight edges and an X-Acto knife to cut away the marks.

Now that the pieces have been cut out you can now start to even out the edges and dye them.
Step 2: Making the pieces
Before dyeing your leather, you may want to smoothen out the edges a bit more. If you are like me, you will end up with a couple misshaped cuts or frayed pieces from not fully cutting through the leather.
This is where sandpaper comes in handy. Use 150+ sandpaper, I use around 220 grit sandpaper. Then I start sanding down every area I made cuts in.

You don’t have to get everything perfect since we will end up sanding these down again after gluing the pieces together. But focus on the conch/button hole and lining the pieces up closer together. If you do not have a hole punch you will definitely need to sand down the button hole a bit.
Once your pieces are looking a bit extra smooth you can now use an edge beveller to thin out the corners of your pieces. This will help when we are slicking the edges to create a very smooth edge.
Press down on the edge of a piece with the edge beveller and run it across the edge. This should create a thin piece of leather that will come off of the corner. These bevellers can be hard to use at first so test it on some scrap pieces to get the feel of it first.

Now we can start applying dye to our leather. Use our full guide for two ways to dye leather for a more detailed explanation on dyeing leather. But to be brief we will use any type of dye, I am using Fiebing’s dark brown dye and some cotton balls. I will also use a rubber glove to avoid dyeing most of fingers along the way.
We will pour some dye onto our cotton balls and begin rubbing the dye into the leather in a circular motion. Add more or less depending on how dark you want the pouch to be. Make sure you go around any holes in your leather also to avoid having to go back and dye them again.
When dying this pouch I wanted to make the edges where my pieces where stitched to have a darker look. So for this I just ran a couple extra coats along the edges of my leather pieces. I also did this for the back where the belt loop piece would sit.

After adding around the edges, you will want to go back and rub in more dye around all of the pieces. This will help avoid the abrupt change in color.
Now that your pieces are all dyed up we will wait 15-20 mins or until dried.
Step 3: Adding Conch/Button
Since I used a screw back buffalo nickel conch it made it very easy to attach to my front pocket piece.
For this I used around a 1/8” diameter hole punch and a mallet to cut a hole into my piece. With the hole punch it allowed me to have a very smooth hole to avoid having to sand down. I then stuck the nickel screw through the hole and screwed on the back cap. I could then start attaching my pieces together.

But if you have a regular button, use the circle on the template to line up the button with the center of the pocket. Press into the leather with an awl into the stitching holes of the button. Now use your awl or single stitching chisel to punch holes in the marked area.
Once the holes have been created, use two needles and stitch the button to the leather. For this I would just go in and over the leather and button twice through each hole then tie and burn off the rest of the thread.
If you are adding the strap you can move on to the next step.
Step 4: Attaching the pieces together
If you do not know how to saddle stitch, you will want to check out our ‘6 steps to hand sew leather’ for this step. We follow basically the same process every time we make a new leather project.
But to start you will want to glue on the strap to the front of the pocket if you are using a strap. Line up your strap, straight across the leather and place it about a ¼” below the front pocket opening. This way it doesn’t interfere as you reach inside the pouch.
Use your scratch awl to scratch away the width of the strap and around ¼” in on the leather surface. This will give you enough room to apply some glue to secure the strap in place.
You will then want to glue the belt strap to the back flap. For this, you will want to place the belt loop ¼” from each edge. This will help you center the belt loop since the pocket is 3.5” and the belt loop is 3” wide.
Mark the area of the belt loop with the awl and mark the outside of each opening for the belt. This will give you an idea of where to scratch and place the strap to once you apply glue.

The glue should be placed in a square shape around the belt loops to avoid gluing the opening in place.
Once glued you will want to saddle stitch the around the outside of the belt loops and the square of the belt loop. This will ensure a tight bond to the back flap and avoid having the belt loops stick up.

Next you will want to apply glue to the backside of the front pocket about 1/4” width around the edge. Apply the same amount to the back flap where the pocket will sit.
For leathercraft cement, you can place these pieces together very quickly. Rub around the area you have just glued then place binder clips around the glued area to keep in place. Allow to dry for around 15 minutes.

If you are using contact cement, you will want to apply the cement then wait about 10 minutes before applying to each other.
Once the cement has dried, you can now start sanding down the edges a bit more. Since they are secured in place it will make it much easier to sand the two edges evenly.
Sand down all the edges until you have a smooth finish and the glue is no longer on the surface.
Now use a stitching groover or wing divider to trace out the line for the stitching. This is another reason why having a smooth edge around your pouch will help. It will allow the groover to run very smooth around the edges of the pouch or any object you are crafting.

Use a stitching chisel set to punch holes around the entire stitching line that was created.
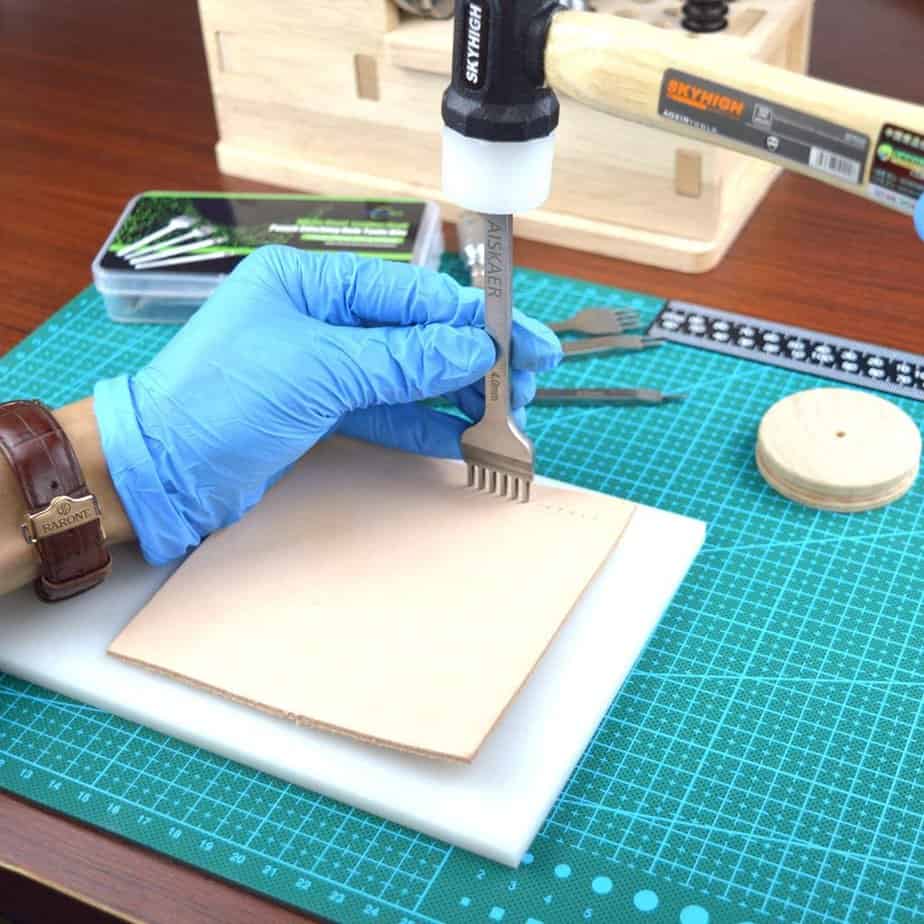
Once the holes are punched you can begin saddle stitching through the holes created. Weave the two needles back forth through the holes until you have reached the end of the pouch. Once you have finished saddle stitching around the pouch, you are just about finished.
Step 5: Finishing touches
Now that the pouch has been all stitched together, you can now finish off the piece.
Use a Q-Tip and dip it into the dye you have used for the project and run this around the edges. Doing this will turn the sanded edges to a darkened fresh edge in no time.

Let the dye dry then apply some Tokonole, this is an edge finisher that is a must for any leather craft. Rub this into the edges of the pouch and the button hole of the back flap with your finger.

Once it has started to set into the leather you can use a hand slicker/burnisher to smooth to “slick” the edges. Rub this across the edges until you have a desired look.
Now that your edges look fresh, apply some sealant of your choice. In this I am using saddle soap, which isn’t the best sealant, but it works pretty decently. You can use other types like leather sheen or the acrylic satin finish depending on the desired look.
Finished Pouch
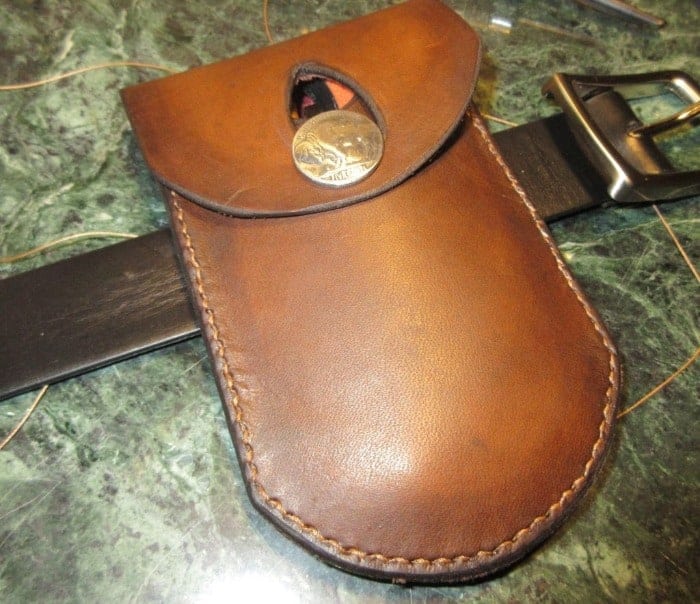
I hope this guide helped run through the steps to make a leather EDC pouch. Pouches can be very simple or very detailed in design so we hope you like our simple design of this EDC pouch.